【Win10 Pre】 Pintarest 風レイアウトな SplitView の UWP アプリをつくる
UWP にはレスポンシブデザイン色の強くなった UI コントロールがいくつか追加されました
中でも SplitView は気軽にレスポンシブなサイドメニューつきレイアウトを実現できるコントロールなので便利です
そこでこの SplitView を使った Pintarest 風レイアウトの UWP アプリをつくってみます
※ Windows 10 Insider Preview Build 10240 時点での情報のため、正式リリース後仕様等が変更になっている可能性があります
Pintarest 風レイアウトにするにはタイルの長さを写真に合わせて変化させる必要があるので、まずは GridView の拡張クラスを追加します
/// <summary>
/// Variable height tiles shows GridView
/// </summary>
public class VariableHeightGridView : GridView
{
    /// <summary>
    /// Prepare specified element for show specified view item
    /// </summary>
    /// <param name="element">specified element for show specified view item</param>
    /// <param name="item">show item</param>
    protected override void PrepareContainerForItemOverride(DependencyObject element, object item)
    {
        var container = element as FrameworkElement;

        if (container != null)
        {
            // Binding ViewModel property "RowSpan" to item container attached property VariableSizedWrapGrid.RowSpanProperty
            container.SetBinding(VariableSizedWrapGrid.RowSpanProperty,
                new Binding()
                {
                    Source = item,
                    Path = new PropertyPath("RowSpan"),
                    Mode = BindingMode.OneTime,
                    TargetNullValue = 1,
                    FallbackValue = 1,
                });
        }

        base.PrepareContainerForItemOverride(element, item);
    }
}
ViewModel の RowSpan を View のアイテムコンテナの添付プロパティ VariableSizedWrapGrid.RowSpanProperty にバインドします
この準備によって VariableSizedWrapGrid パネルがアイテムコンテナに添付された RowSpan のプロパティ値を読み取り、タイルごとに縦幅を変化させて配置してくれるようになります
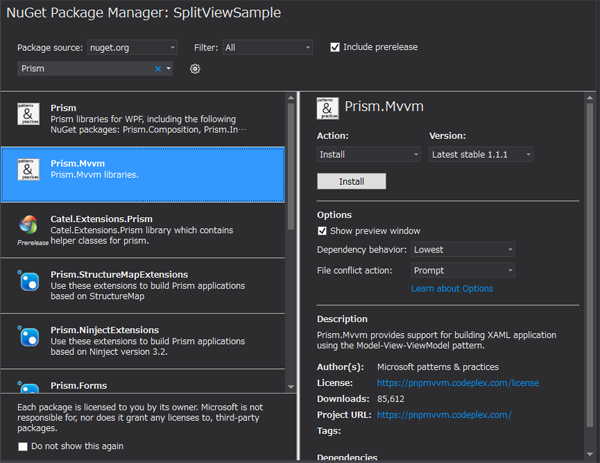
次に ViewModel 用にライブラリを Nuget でインストール

毎度おなじみ Prism.Mvvm
ライブラリのインストールが終わったらデータのいれものの ViewModel を追加します
/// <summary>
/// MainPage ViewModel
/// </summary>
public class MainPageViewModel : BindableBase
{
    /// <summary>
    /// Photo items collection
    /// </summary>
    public IList<PhotoItemViewModel> Photos = new ObservableCollection<PhotoItemViewModel>();

    /// <summary>
    /// Update image height size
    /// </summary>
    /// <returns>Task</returns>
    public async Task Initilize()
    {
        this.Photos.Add(new PhotoItemViewModel { ImageSource = @"ms-appx:///Assets/Photos/photo01.jpg" });
        this.Photos.Add(new PhotoItemViewModel { ImageSource = @"ms-appx:///Assets/Photos/photo02.jpg" });
        this.Photos.Add(new PhotoItemViewModel { ImageSource = @"ms-appx:///Assets/Photos/photo03.jpg" });
        this.Photos.Add(new PhotoItemViewModel { ImageSource = @"ms-appx:///Assets/Photos/photo04.jpg" });
        this.Photos.Add(new PhotoItemViewModel { ImageSource = @"ms-appx:///Assets/Photos/photo05.jpg" });
        this.Photos.Add(new PhotoItemViewModel { ImageSource = @"ms-appx:///Assets/Photos/photo06.jpg" });
        this.Photos.Add(new PhotoItemViewModel { ImageSource = @"ms-appx:///Assets/Photos/photo07.jpg" });
        this.Photos.Add(new PhotoItemViewModel { ImageSource = @"ms-appx:///Assets/Photos/photo08.jpg" });
        this.Photos.Add(new PhotoItemViewModel { ImageSource = @"ms-appx:///Assets/Photos/photo09.jpg" });
        this.Photos.Add(new PhotoItemViewModel { ImageSource = @"ms-appx:///Assets/Photos/photo10.png" });
        this.Photos.Add(new PhotoItemViewModel { ImageSource = @"ms-appx:///Assets/Photos/photo11.jpg" });
        this.Photos.Add(new PhotoItemViewModel { ImageSource = @"ms-appx:///Assets/Photos/photo12.jpg" });
        this.Photos.Add(new PhotoItemViewModel { ImageSource = @"ms-appx:///Assets/Photos/photo13.jpg" });
        this.Photos.Add(new PhotoItemViewModel { ImageSource = @"ms-appx:///Assets/Photos/photo14.jpg" });
        this.Photos.Add(new PhotoItemViewModel { ImageSource = @"ms-appx:///Assets/Photos/photo15.jpg" });
        this.Photos.Add(new PhotoItemViewModel { ImageSource = @"ms-appx:///Assets/Photos/photo16.jpg" });
        this.Photos.Add(new PhotoItemViewModel { ImageSource = @"ms-appx:///Assets/Photos/photo17.jpg" });

        foreach (var photo in this.Photos)
        {
            var file = await StorageFile.GetFileFromApplicationUriAsync(new System.Uri(photo.ImageSource));
            using (var stream = await file.OpenAsync(FileAccessMode.Read))
            {
                var bitmap = new BitmapImage();
                bitmap.SetSource(stream);
                photo.RowSpan = (int)Math.Round(180d * bitmap.PixelHeight / bitmap.PixelWidth, MidpointRounding.AwayFromZero);
            }
        }
    }
}

/// <summary>
/// Photo item ViewModel
/// </summary>
public class PhotoItemViewModel : BindableBase
{
    /// <summary>
    /// Image source path
    /// </summary>
    private string imageSource = string.Empty;

    /// <summary>
    /// Row span count
    /// </summary>
    private int rowSpan = 1;

    /// <summary>
    /// Image source path
    /// </summary>
    public string ImageSource
    {
        get { return this.imageSource; }
        set { this.SetProperty<string>(ref this.imageSource, value); }
    }

    /// <summary>
    /// Row span count
    /// </summary>
    public int RowSpan
    {
        get { return this.rowSpan; }
        set { this.SetProperty<int>(ref this.rowSpan, value); }
    }
}
画面用の ViewModel に MainPageViewModel、それぞれのタイル用の ViewModel に PhotoItemViewModel を追加しました
PhotoItemViewModel は先ほどの RowSpan と写真のファイルパスを指定する ImageSource のプロパティを持っています
MainPageViewModel は Initilize メソッドの中で PhotoItemViewModel のコレクションを生成し、下記のように指定したファイルパスの画像ファイルを読み取り、アスペクト比によってタイルの縦幅を決めて RowSpan に指定するようにしています
        foreach (var photo in this.Photos)
        {
            var file = await StorageFile.GetFileFromApplicationUriAsync(new System.Uri(photo.ImageSource));
            using (var stream = await file.OpenAsync(FileAccessMode.Read))
            {
                var bitmap = new BitmapImage();
                bitmap.SetSource(stream);
                photo.RowSpan = (int)Math.Round(180d * bitmap.PixelHeight / bitmap.PixelWidth, MidpointRounding.AwayFromZero);
            }
        }
最後に View 側のコード
<Page x:Class="SplitViewSample.MainPage" xmlns="http://schemas.microsoft.com/winfx/2006/xaml/presentation" xmlns:x="http://schemas.microsoft.com/winfx/2006/xaml" xmlns:local="using:SplitViewSample" xmlns:d="http://schemas.microsoft.com/expression/blend/2008" xmlns:mc="http://schemas.openxmlformats.org/markup-compatibility/2006" RequestedTheme="Dark" mc:Ignorable="d"> <Grid Background="{ThemeResource ApplicationPageBackgroundThemeBrush}"> <Grid.RowDefinitions> <RowDefinition Height="48"/> <RowDefinition Height="*"/> </Grid.RowDefinitions> <ToggleButton x:Name="HumberButton" Width="48" HorizontalAlignment="Left" VerticalAlignment="Stretch"> <FontIcon FontFamily="Segoe MDL2 Assets" Glyph="" /> </ToggleButton> <TextBlock Text="Photo collections" FontSize="24" VerticalAlignment="Center" Margin="80,0,0,0"/> <SplitView Grid.Row="1" CompactPaneLength="48" DisplayMode="CompactInline" IsPaneOpen="{Binding ElementName=HumberButton, Path=IsChecked, Mode=OneWay}"> <SplitView.Pane> <ListBox Background="Transparent" Margin="0" Padding="0"> <Grid> <FontIcon FontFamily="Segoe MDL2 Assets" Glyph="" HorizontalAlignment="Left" VerticalAlignment="Center" Margin="2,2,0,0"/> <TextBlock Text="Search" Grid.Column="1" Grid.Row="0" VerticalAlignment="Center" Margin="48,0,0,0"/> </Grid> <Grid> <FontIcon FontFamily="Segoe MDL2 Assets" Glyph="" HorizontalAlignment="Left" VerticalAlignment="Center" Margin="2,2,0,0"/> <TextBlock Text="Like" Grid.Column="1" Grid.Row="0" VerticalAlignment="Center" Margin="48,0,0,0"/> </Grid> <Grid> <FontIcon FontFamily="Segoe MDL2 Assets" Glyph="" HorizontalAlignment="Left" VerticalAlignment="Center" Margin="2,2,0,0"/> <TextBlock Text="Settings" Grid.Column="1" Grid.Row="0" VerticalAlignment="Center" Margin="48,0,0,0"/> </Grid> </ListBox> </SplitView.Pane> <SplitView.Content> <local:VariableHeightGridView x:Name="GridView" Background="#222222" ScrollViewer.HorizontalScrollMode="Disabled" ScrollViewer.HorizontalScrollBarVisibility="Disabled" ScrollViewer.VerticalScrollMode="Auto" ScrollViewer.VerticalScrollBarVisibility="Auto" ScrollViewer.ZoomMode="Disabled"> <GridView.ItemsPanel> <ItemsPanelTemplate> <VariableSizedWrapGrid Orientation="Horizontal" ItemWidth="180" ItemHeight="1" HorizontalAlignment="Center"/> </ItemsPanelTemplate> </GridView.ItemsPanel> <GridView.ItemTemplate> <DataTemplate> <Border Padding="2,2,0,0"> <Image Source="{Binding ImageSource}" Stretch="Uniform"/> </Border> </DataTemplate> </GridView.ItemTemplate> </local:VariableHeightGridView> </SplitView.Content> </SplitView> </Grid> </Page>
SplitView を使ってサイドメニュー部分の SplitView.Pane とタイル表示されるコンテンツ部分の SplitView.Content を分けて指定しています
SplitView.Pane は ListBox でアイコンとラベル部分を左右に並べて配置しました
アイコンは Segoe MDL2 Assets のフォントで代用しましたが、下記のサイトの文字コード対応表を利用すると便利です
また SplitView.IsPaneOpen に左上隅に表示する HumberButton という名前の ToggleButton の IsChecked プロパティをバインドしているので、左上隅に表示されるハンバーガーボタンの操作で、SplitView のサイドメニューが開閉します
今回の一番大事なところ
                <local:VariableHeightGridView x:Name="GridView"
                                              Background="#222222"
                                              ScrollViewer.HorizontalScrollMode="Disabled"
                                              ScrollViewer.HorizontalScrollBarVisibility="Disabled"
                                              ScrollViewer.VerticalScrollMode="Auto"
                                              ScrollViewer.VerticalScrollBarVisibility="Auto"
                                              ScrollViewer.ZoomMode="Disabled">
                    <GridView.ItemsPanel>
                        <ItemsPanelTemplate>
                            <VariableSizedWrapGrid Orientation="Horizontal"
                                                   ItemWidth="200"
                                                   ItemHeight="1"
                                                   HorizontalAlignment="Center"/>
                        </ItemsPanelTemplate>
                    </GridView.ItemsPanel>
                    <GridView.ItemTemplate>
                        <DataTemplate>
                            <Border Padding="2,2,0,0">
                                <Image Source="{Binding ImageSource}" Stretch="Uniform"/>
                            </Border>
                        </DataTemplate>
                    </GridView.ItemTemplate>
                </local:VariableHeightGridView>
最初に作った VariableHeightGridView を SplitView.Content に配置しました
GridView.ItemsPanel にはタイル縦幅に応じたレイアウトをするための VariableSizedWrapGrid を指定し、タイル横幅は 180 px 固定、縦幅は 1 px 単位で変化するようにしました
タイルの中身は Image による画像表示があるだけです
最後に View のコードビハインド
/// <summary>
/// An empty page that can be used on its own or navigated to within a Frame.
/// </summary>
public sealed partial class MainPage : Page
{
    /// <summary>
    /// ViewModel
    /// </summary>
    public MainPageViewModel ViewModel = new MainPageViewModel();

    /// <summary>
    /// Constructor
    /// </summary>
    public MainPage()
    {
        this.InitializeComponent();

        this.Loaded += this.OnLoaded;
    }

    /// <summary>
    /// Loaded event handler
    /// </summary>
    /// <param name="sender">event sender</param>
    /// <param name="e">event arguments</param>
    private async void OnLoaded(object sender, RoutedEventArgs e)
    {
        await this.ViewModel.Initilize();
        this.GridView.ItemsSource = this.ViewModel.Photos;
    }
}
画面読み込み完了の Loaded イベント時に ViewModel の Initilize メソッドを呼び出し、データを作って 先ほどの GridView.ItemsSource に Photos コレクションを設定しました
Windows 10 でコンパイル時バインディングの x:Bind の仕様が追加されたためか、GridView.ItemsSource に Binding してもうまく反映されないので直接指定しました・・・これは正式リリースで直るのか、やり方が悪いだけ?!
とにもかくにもおためし実行


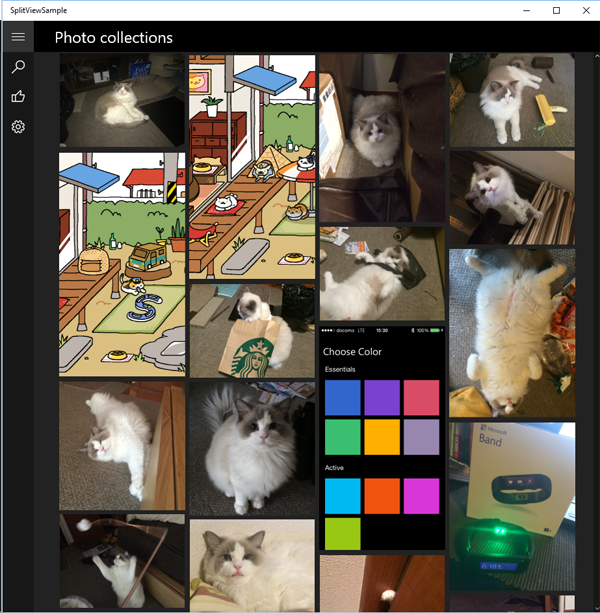
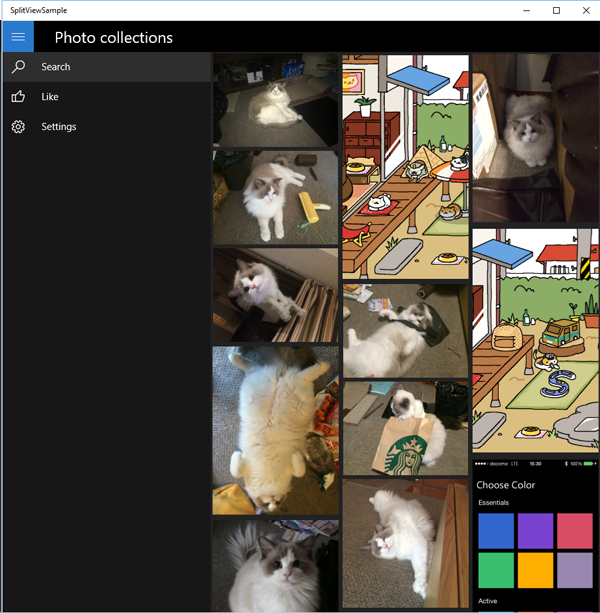
SplitView のおかげでウィンドウの横幅に応じてちゃんとタイルが折り返されるようになっていますね

左上隅のハンバーガーボタンを押すとサイドメニューが開き、コンテンツ領域が狭くなります
意外とすんなりできましたね